Showing posts with label "how to" movie video picasa "make a video" easy information google. Show all posts

Sunday, September 19, 2010

How to Make Your Own Videos for FREE - Final with Video

The first thing you will need to do is get Google's Picasa - it is a free photo program that works well with any type of picture not just photos.
You can easily load photographs from your camera to Picasa or import saved files to view. My favorite part of acquiring photos from my camera is that Picasa gives you the option to erase from your camera all the photos you are putting on you computer. This saves me time having to delete photos from my camera. There is an area where you can make collages which is one of the things I do for parts of my photo videos. You can make a mosaic, a picture pile, a framed mosaic, a grid or a contact sheet, so your options are pretty good.


~~~~~~~~~~~~~~~~~~~~~~~~


PART 3
You are now ready to put it all together.
After you have your title page set you will be able to put your photos in the order you want from the time line at the bottom of the 'Movie Maker' window. You just drag and drop the photos.
The image below is the time line.


When you want to add a new text side click on #2.
A blank frame with the work text will appear and the menu bar will open to the slide bar where you will add text / change the background color and the way the text displays.
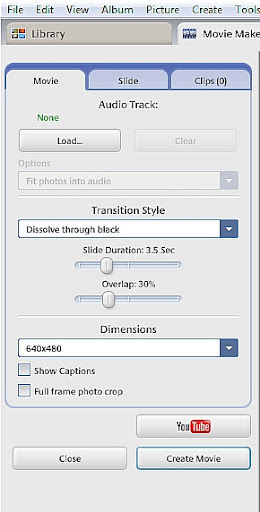
We will be working with the movie menu bar again. This time you will learn about the options under the tab 'Movie'


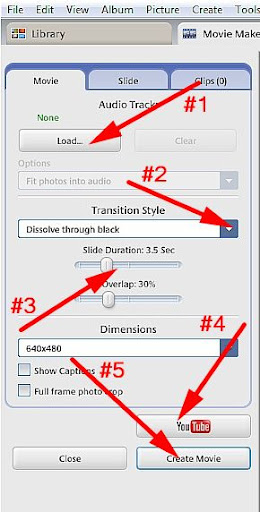
#1 - After you have your photos and slides place where you want them you can add audio.
On the 'Movie' tab click on load - your explorer will open in order to let you choose an audio file.
The option under load is grayed out in the image above. It says options and it allows you to choose how you want your music to play. I suggest using 'truncate audio' which will make the music fit to your video.
#2 - Choose a transition style. This is one of the things I don't like about Picasa, you can only choose one transition style and it is used on the entire video. I used 'Pan and Zoom'
#3 - The duration is the amount of time you want each frame to show. Like the transitions you can only choose one duration which is used on all the frames, mine is set at 2 sec.
#4 - Create movie. I never tried to upload to Youtube before creating the movie. I don't know if it is possible. After you create the movie go to your project folder and right click on it. Click on view and edit. When movie maker opens your video will start just click on the pause button on the time line to stop it,
Now you are ready to upload it to Youtube. First you need to have an account with Youtube, register. When you click on upload to Youtube you will be able to add a title and a description. There is a drop down menu for your video category. If you want everyone to be able to see it check the box for make it public.

Here is the final video - in order to figure the process out please see the rest of this article.


The next big project will be trying to explain to you Windows Movie Maker

Marisa Horn
a/k/a kashmier


Friday, September 10, 2010

How to Make Your Own Videos for FREE Part 2a

The first thing you will need to do is get Google's Picasa - it is a free photo program that works well with any type of picture not just photos.
You can easily load photographs from your camera to Picasa or import saved files to view. My favorite part of acquiring photos from my camera is Picasa gives you the option to erase from your camera all the photos you are putting on you computer. This saves me time having to delete photos from my camera. There is an area where you can make collages which is one of the things I do for parts of my photo videos. You can make a mosaic, a picture pile, a framed mosaic, a grid or a contact sheet, so your options are pretty good.
~~~~~~~~~~~~~~~~~~~~~~~~
PART 2a
This article will cover how to set up your program files to make your video.
- What you will want to do is start a new album for your video. Since I have photos already in my program that I am using the easiest way to start this album is to locate where many of the photos are. In my case they are in the "Spring photos for frame" file. You will see this in the next image.
- Next click on the icon at the top of the page to create a new album. You should have no trouble finding these icons because when your cursor hoovers over them the text for each shows up. Below I added an arrow to show you exactly where this icon is. When you click on the icon a small window will come up. I was not able to make a copy of this window. There are a few boxes you can fill in:
The name you want to use ( I used 'How to Movie' )
Today's date will be there automatically
There are a few other things like description and music choice but all can be done later.
start
- After you finish with creating the album go back to where your photos are located. Find a photo you want to include and right click on it. A menu will appear with a long assortment of options. Hoover over the second one 'add to album' another menu will open with any albums you already have. Click on the album you just made for your movie. Repeat this for all the photos you want to use or go to the next step. I recommend not putting in many photos just yet.
- Find your album ('How to Movie' in my case) in the left menu bar. It should be at the top above your photos listed. High litght it and the photos you have already saved to it will show in the display area. As you can see in the image below I saved three photos in mine.
Now you are ready to start making a movie.
- Above the photos in the display area click on the 'create movie presentation icon' shown in the next image.
The next screen that opens is where you will be creating your movie. The name of your album will show up as the title and the photos you have already entered into your album will show in the time line.
You can start a movie from any file you already have in Picasa but then you will have to change more in the next area. I was going to start with the file holding all the 'Spring photos for frame' photos but then I would have to delete over 100 of them from the time line.
Below is an image of the menu bar you will now be working with.
Movie Maker
I will discuss the movie maker further, starting with how to add and design your title in the next article.
If you have downloaded this program and are working along with these articles please message me with any questions I have not covered.

Marisa Horn
a/k/a kashmier
Youtube videos done with Picasa and windows movie maker
http://www.youtube.com/user/lthrwood

Whimsical Wizard Design Winners

February 2012 iiphotoArt March 2012 What's Your Pleasure April 2012 WonderArt